After my post HOW TO create NAV Instances with multiple builds in the same machine, it’s time to expand that post including a “super-easy method” to add a new NAV Web Instance for a different build.
The concept once again is that you are working with a version of Dynamics NAV (particular build) installed in your machine of which you have already configured the Web Client and now you want to create a new NAV Web Instance for a different build (scenario of my previous post).
Under the hook
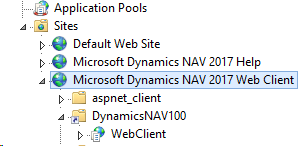
Let analyze, for example, the structure of the Web Client for NAV 2017.
The following picture, from Internet Information Service (IIS) Manager, shows that there is a website called Microsoft Dynamics NAV 2017 Web Client that can contain one or multiple NAV Web Instances. In this case, it contains a NAV Web Instance named DynamicsNAV100 which is a Virtual Directory (we can notice it from the icon) that contains an Application called WebClient.
Right-click on DynamicsNAV100 and selecting Explore it will open the content of the virtual directory in a File Explorer window:
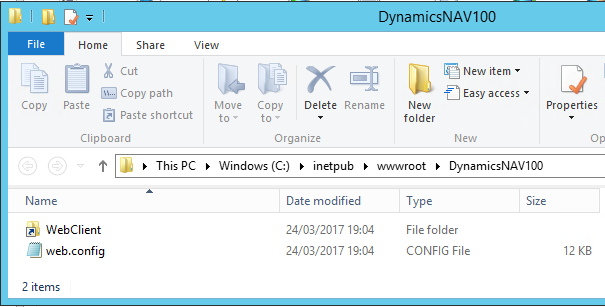
So now we know the content of the Virtual Directory, which includes actually two items, and the location where it is stored, at the path
C:\inetpub\wwwroot\DynamicsNAV100
What are these two items?
- web.config is a file containing the configuration of the NAV Web Instance
- WebClient, with an icon similar to a shortcut, is a Symbolic Link.
Right-click on the symbolic link WebClient shows in the properties, in the Shortcut tab, the path of the NAV Web Client folder as Target:
C:\Program Files\Microsoft Dynamics NAV\100\Web Client
However, double-click on the symbolic link WebClient allows the user to navigate inside NAV Web Client folder “pretending” that those files are stored in the Virtual Directory folder.
Hint: If a symbolic link is deleted, its target remains unaffected.
At this point, we have enough knowledge to manipulate this information to achieve our goal.
HOW TO create NAV Web Instances with multiple builds in the same machine
In this example, I consider NAV 2017 but the same concepts can be applied to multiple versions of NAV.
Prerequisites/Preparation:
- Microsoft Dynamics NAV 2017 (10.0.14199, CU 1) installed including Web Server Components
- Cumulative Update package, in this example the latest CU 39 (build 10.0.30160), downloaded from the Microsoft Support website
After you installed NAV 2017, the Web Client files will be inside the following path:
C:\Program Files\Microsoft Dynamics NAV\100\Web Client
Copy the content of the Web Client folder from the Cumulative Update package (DVD zipped)
C:\Temp\CU 39 NAV 2017 W1\NAV.10.0.30160.W1.DVD\WebClient\Microsoft Dynamics NAV\100\Web Client
Into a new folder:
C:\Program Files\Microsoft Dynamics NAV\100 - Build 30160\Web Client
Now you can create a new Web Server Instance using PowerShell command, e.g.
New-NAVWebServerInstance -WebServerInstance SecondWebInstance -Server MyServer -ServerInstance NAV2017CU39 -ClientServicesCredentialType Windows -ClientServicesPort 7146Then navigate to the following path
C:\inetpub\wwwroot\SecondWebInstanceDelete the WebClient link and then recreate it to point to the new version folder created before:
mklink /d "C:\inetpub\wwwroot\SecondWebInstance\WebClient" "C:\Program Files\Microsoft Dynamics NAV\100 - Build 30160\Web Client"Did my HOW TO help you? Leave a reply.